NB: This pattern is for personal use ONLY!
PLEASE NOTE: This is a INTERMEDIATE tutorial. You do have to have some knowledge when it comes to making plushies.
Hi Crafties,
This is going to be a long post, I’m sorry for that. I thought about breaking it up into more than one post but decided against it. I’m sure you would want the whole tutorial not bits and pieces every week.
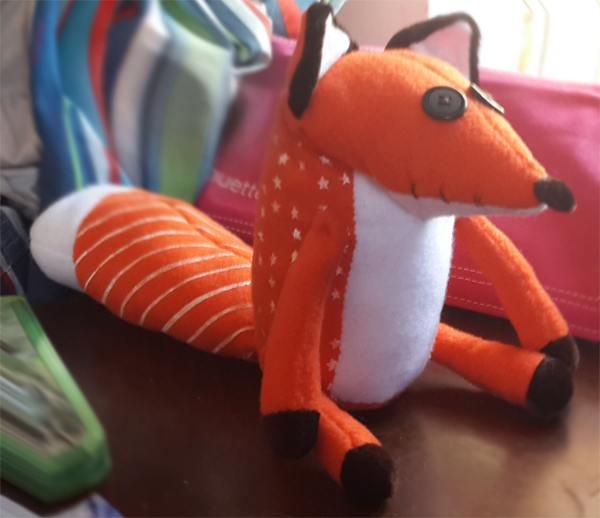
My sister sent me a whats-app the other day with a picture of a plushy in the shape of a fox. (The fox from the Little Prince)
My nephew wants it with a sore heart but she can’t find one in South Africa. So she asked me if I could make one for him.
I looked at the image and said sure, I’d give it a go, and my nephew was so excited I knew I had to do the best job I’d ever done.
So on the Saturday I went to the local fabric store… The first one was a bust, nothing I could use to make the plushy.
The second store was much better (The one in Pierre Van Ryneveld) for those of you in the area.
They don’t stock mini-velvet or the usual fabrics you’d use for that kind of plushy and I didn’t want to use felt.
So I ended up getting an orange fleece (very bright but good enough) for the main body.
A white fleece for the underbelly and accents and a brown normal velvet for the other bits and bobs.
(I’d like to add that the lady working in the shop was an absolute pleasure, after I showed her a picture of the fox on my tablet she whizzed around the shop showing me what she thought might work.)
1m of the fleece and half a meter of the velvet. Sewing cotton for the orange, because I didn’t have a color and two buttons for the eyes. All together that cost my sister (because she paid for the supplies) R175. Not bad and extra fabric for craft fails.
I’m going to be sharing the pattern and the cut file and I’ll be walking you through how to do this step by step
Design the pattern: I looked. I really did, but nowhere could I find a free pattern for the fox.
I had to look at the picture and design the pattern from scratch.
I will put a download link at the end of the post for everything you need.
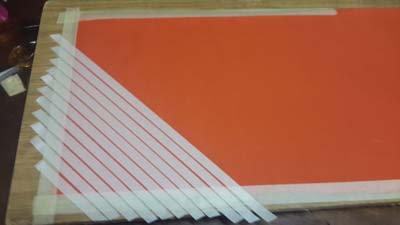
That done, I had to figure out how I was going to add stars and stripes to the orange fleece. Because the back of the fox has stars on it and its tail has stripes.
This gave me the perfect opportunity to play with my new toy.
I recently got a Silhouette Cameo and I’m still learning how to work it.
Materials and Supplies you will need:
Cut file and Pattern (Get in download at end of the post)
Orange Fleece
White Fleece
Brown Velvet
(you need less than half a meter of each.)
Cardstock
White paint
Bristle or Stencil brush
General sewing Supplies.
Two buttons for the eyes.
Stuffing
Plastic Beads (optional)
Laminating machine and pouches (optional)
Making the Stencil:
(This part is done for you, there is a cut file in the download)
I’m only explaining in case someone would prefer a different pattern or wanted to know how I did it.
- I started by opening photoshop and getting a preset star shape. I drew it out and printed it to make sure it was small enough.
- Then I saved that as a png and opened it in silhouette studio.
- I opened the tracing tab and traced the star (outer edge) and then deleted the drawn star.
- I copied and pasted the star putting together a pattern, an off center scattering of stars.
- I repeated the design until I was happy
- Then I sent it to the Cameo
- I used plain old card stock. Since I’m only going to do this design once I didn’t feel the need to waste stencil material on it.
(Find the cut file in the download at the end of the post)
If you don’t have the luxury of having a cutting machine:
Another way of adding the stars would be to cut them out by hand out of card stock with an exacto knife and stencil them in that way
Or
Using a small star stamp and painting the white paint onto it then randomly stamping stars on.
Or
Use a punch in the shape of a star to create a mini template.
Painting the patterns onto the fabric:
I placed the orange fleece on a board – for added stability – and put the card stock stencil over it. I used a stencil brush and white acrylic paint and dabbed against the stencil until the little stars were all over the fabric.
You don’t have to use a stencil brush, any kind of hog hair or bristle brush will do the trick. A harder brush will work better than a soft brush.
Once all of that was done I taped another piece of fabric onto a board with masking tape, then I used thin masking tape and made diagonal stripes using the tape. It worked the same way as a stencil and I could paint the stripes on by dabbing with a stencil brush and white paint.
Drying the Fabric:
Because I’m impatient I sat with the hairdryer I keep in my studio and dried the fabric as I worked. But you could let it dry naturally.
Bear in mind. Hairdryer is best for this kind of thing. Acrylic paint contains a certain amount of glue, and if you use a heat gun the glue in the paint might bubble.
Now the fabric prep is done. On to the next.
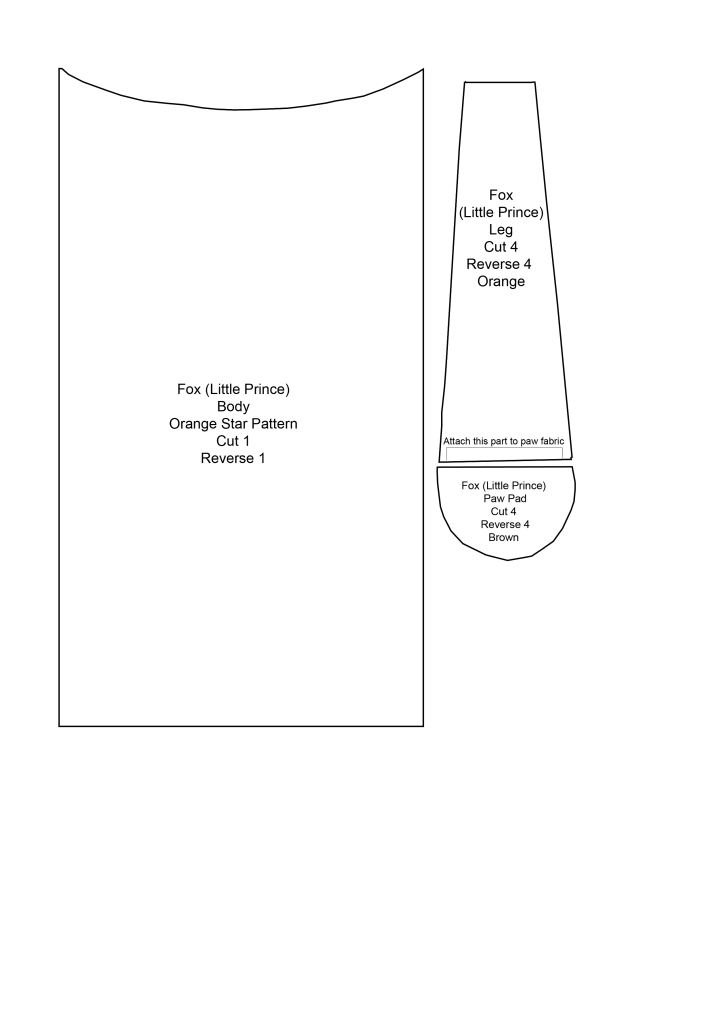
Pattern Prep:
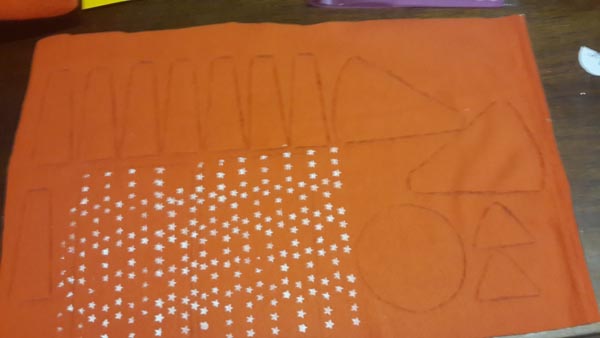
- Print out the pattern pieces and laminate the paper. This adds stability to the paper and makes your pattern easier to use and manage.
(If you don’t have a laminator, you can trace the pattern pieces onto an old cereal box or onto an old x-ray ((clean it with bleach first)) - Cut out all your pattern pieces and lay them on the fabric.
- Use a 2B pencil or softer 3B or 4B to trace around the pattern pieces on the light fabric. For the darker fabric, I used a white gelly-roll pen. Any light colored gel pen will work well.
- Cut out all your pieces and put them one side.
Starting to sew:
A note on stitching. All my plushies are hand stitched using a stab stitch and a back stitch. You have more control over the curves and edges if you hand stitch. I use a small neat stab stitch. diagram for stab stitch
- Take one of the leg pieces and sew the bottom of it to the bottom (flat end) of the paw. Right sides together, when you are done it will look like half a leg with the paw part finishing it. Do this on all eight leg pieces.
- Take two leg pieces (with the paw pad attached) and sew them right sides together leaving the very top open.
- Turn the right way around.
- Stuff the leg making sure that the foot part is stuffed nice and full then stuff until the leg is full. Don’t over stuff it, remember this has to have a bit of a floppyness to it, and if you over stuff it you won’t get that effect.
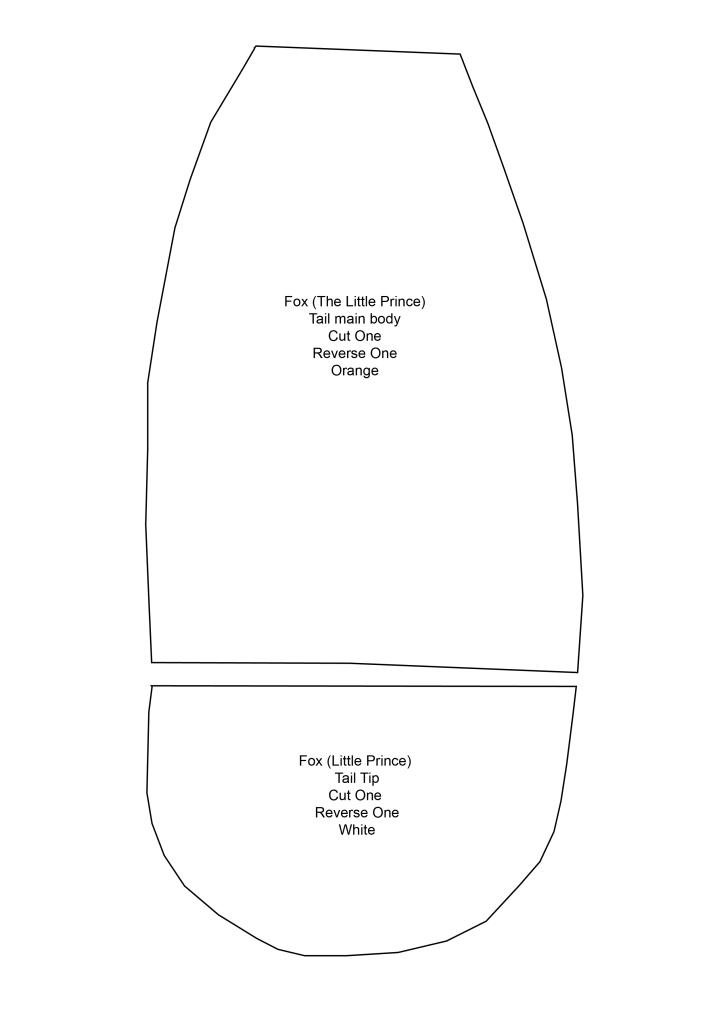
- Take the two stripped tail pieces and right sides together sew the long edges. Do NOT sew the short edges at all.
- Take the rounded white tail part and sew around the curve leave it open at the top.
- Now fold the orange tail in half so that its seams are on the top and bottom in the center not the sides like they normally would be Then turn the white part of the tail so the seams are on the ides. (The seams are offset) and sew right sides together.
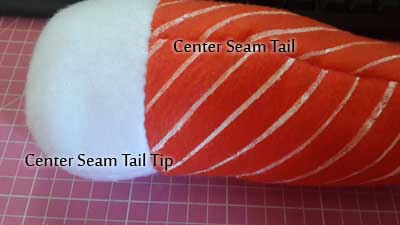
- Turn the right way around and stuff. Remember to not over stuff.
- Sew the top closed.
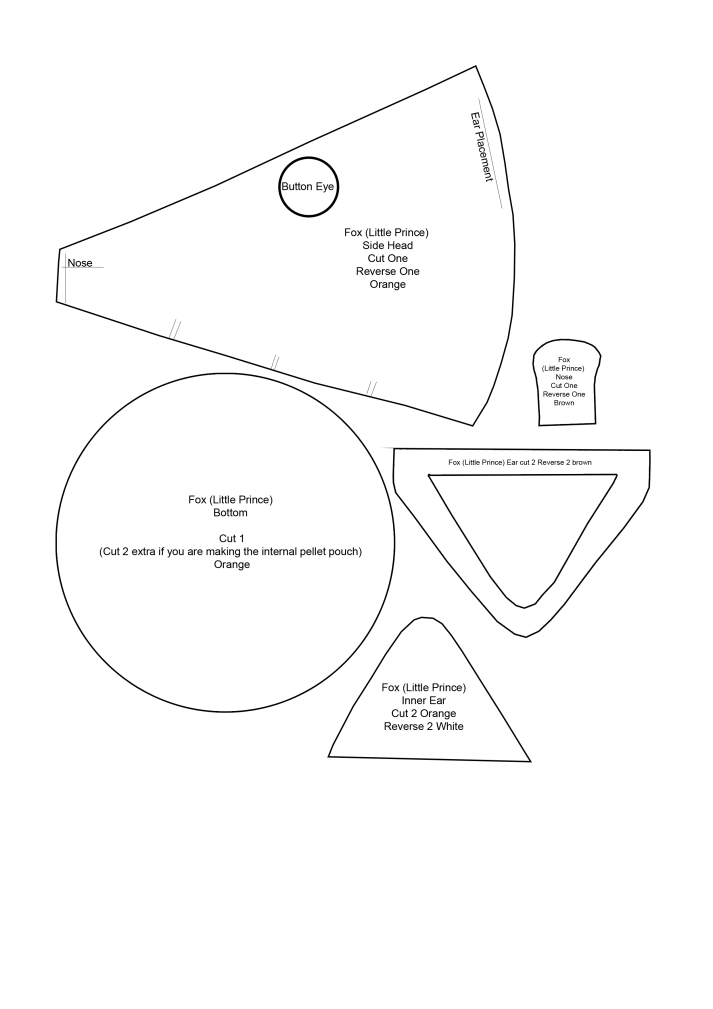
- The ears are a bit tricky. You have to sew an orange triangle and a white triangle into the holes in the brown velvet. Be sure to keep right sides together.


- Once that is done you can sew one brown/orange and one brown/white (right sides together) and turn out. Leave the bottom of the ear open.
- Sew the top of the side face together. Leave the bottom open
- Sew the top of the side back together. Leave the bottom open.
- Put the top of the head and the top of the back together right sides together and sandwidge the ears in between the two pieces half a centimeter from the center seam. You might find it easier to pin all of this in place. It’s tricky but try not to pull the brown of the ears too far out.
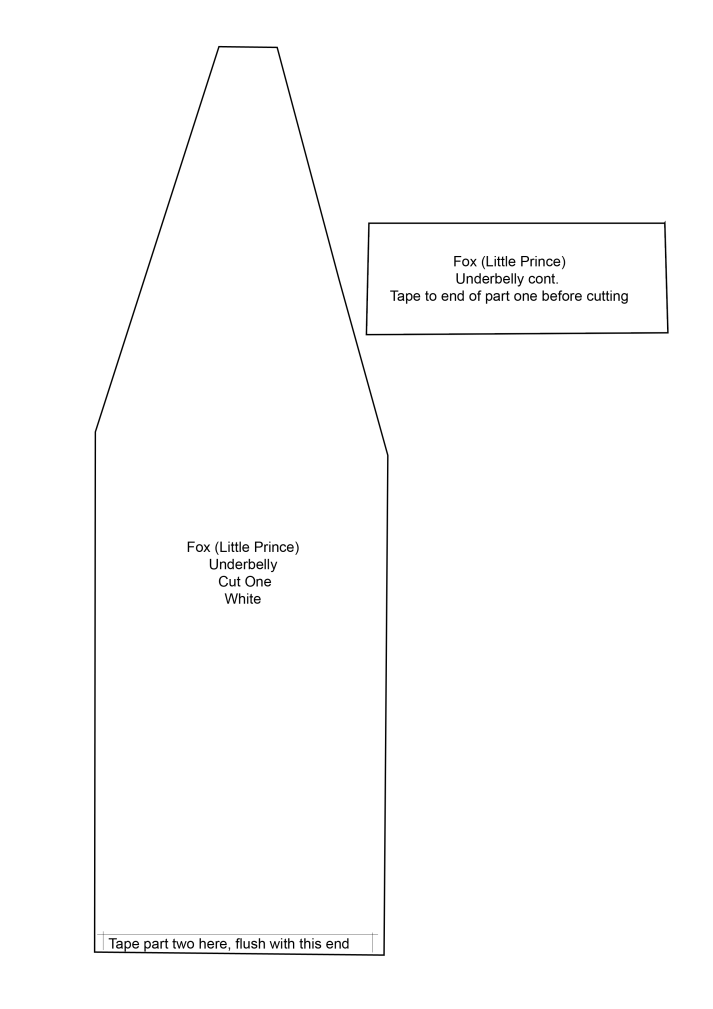
- Now you can take the white belly fabric and starting at the nose sew it down each side
- Keep the fox turned inside out.
- Put the tail into the body of the fox so that you can sandwidge it to the orange part of the body as you sew in the round bottom.
- Leave the white belly part unsewn.
- Turn the fox the right way around.
Optional: The Plastic pellets
- Take the extra two pieces you cut of the bottom and sew them leaving an opening. Turn them out (The seam on the inside gives extra stability that’s why you turn it out.) Fill the little pouch with plastic pellets and sew closed.
- Stuff the fox and right at the bottom insert the plastic pellet pouch. That way when the fox sits there is extra weight and he balances better.
- Sew the rest of the bottom closed.
- Sew around the curved edge of the nose and turn it out. Stuff it with a little stuffing and stitch it to the tip of the face.
- You can now add the button eyes onto the fox.
- Stitch the legs into place
- Last step: Taking brown embroidery floss stitch little parallel lines over the steam on the side of the face where the mouth of the fox is.
- Catch some of the white fabric under the chin and stitch it down onto the chest so the fox’s head is bent.
There you go. You now have a fox
Click on the image and it will bring up a page,
at the bottom right side is a link “View full size.”
Click on that
then be sure to click the plus sign that pops up when you hover your mouse over the image.
Right click, save to your computer and print.
My nephew looooove his fox and is very happy with it 🙂

Hi, congratulations on a well made fox. I have the same request from my Granddaughter and have searched hi and low for a pattern . I am so grateful to you for this tutorial and I am about to embark on making the fox today.
LikeLike
Thank you! I’m so glad I could help! If you have any questions or anything is unclear feel free to get hold of me and ask. I’ll be happy to help in any way. Good luck!
LikeLike
Thank you Genevieve. My problem is that my computer is rather outdated and I have not been able to download the pattern. Is there any other way I can get hold of your pattern. I’m also not very clued up when it comes to new technology.
I live in Port Elizabeth and I am so happy to find someone in South Africa who provides patterns and tutorials. Thanks again for you assistance.
LikeLiked by 1 person
Hi Marie, I’ve gotten your email address and I’m going to send you the pattern pieces directly. I’m more than happy to help a fellow Sefrican hehe 😉
LikeLike
I am eternally grateful to you. My little granddaughter is 8 and going through a rather tough time at the moment. she is in Johannesburg and I am here in Port Elizabeth and I know this little fox will give her so much joy. Thank you so much for your kind generosity.
.
LikeLiked by 1 person
I hope your little fox gives her tons of happiness and helps her though her tough time 🙂
LikeLike
Ethan absolutely loves his Fox and doesn’t go to sleep without him. It’s definitely his favourite stuffed animal. Only Genevieve could make this happen for him. Thank you so much!
LikeLike
You are so very welcome, Anet. I loved making Mr. Fox for my little guy. ❤
LikeLike
I too was unable to download the pattern, and I would love to make it with my schoolkids. we recently saw the film at the cinema. could you please email me the pattern?
LikeLike
I was also unable to download the pattern and would love to make this with my schoolkids. we recently saw the film at the cinema. thanks!
LikeLike
Sure thing 😀
LikeLike
thank you…I love Little Prince and I’ve spent so much time looking for the sewing pattern of the fox! your plush is wondrful!
LikeLike
You are so very welcome. I’m glad I could help you 😀
LikeLike
Wow, thanks so much for your time and effort into this. ❤ ❤ Really appreciate it, and can spread the love to my son. ❤
LikeLike
You are so welcome 🙂
LikeLike
Hello Genevieve! Thank you for creating this pattern, my son and I would like to try our hand at it. I am having trouble downloading the pdf, could you please email it to me? I would be most grateful!
LikeLike
Sure thing. Its on its way to you 😀
LikeLike
Hi, Love this ! But can’t get it to download. Could you please email it to me too?
LikeLike
😉 On its way to you.
LikeLike
Hi there. My little girl and I watched the movie together last week and we both cried. She would love this fox but I cannot get it to download. Could I trouble you to email it to me as well? Thank you.
LikeLike
Hi there. My daughter and I watched the movie on the weekend. We both loved it and cried at the end. Couldn’t download your pattern however, could you send it to me? Thank you.
LikeLike
On the way 😉 I hope you enjoy making him.
LikeLike
Morning
Will it be possible to email me the pattern please, It’s my daughters birthday in October, she’s busy with the book now and I would love to make the fox as a surprise. Thank you
LikeLike
Hi, please send me the pattern for the fox – I cannot seem to download it – I want to make one for our grandchild in East London. We watched the movie last weekend and he fell in live with the Fox – want to surprise him with his own fox.
LikeLike
On the way. Enjoy!
LikeLike
Hello Genevieve,
I’m staying in Centurion, Gauteng and was wondering if you would be willing to sell a Little Prince’s Fox to me! I’ve been searching for them for a long time and even tried to order from America, with no luck! I’m actually interested in more than one, depending on the price. You don’t know how much this would mean to me! Please let me know if you would concider and what the price would be.
Greetings,
Tessa Buys
LikeLike
Hi Tess, I’m going to shoot off an email to you in a minute. 😉
LikeLike
I recently found your tutorial, Genevieve, and it is terrific! I downloaded the patterns, but am confused about the size of the pattern pieces. One aspect seems very small and the + view is HUGE, much bigger than an 8.5 x 11″ piece of paper. Only part of a pattern piece will print at that size. Got any clues for me? Oh, I’m in the U.S., if the paper size is off to you.
I found some suede-ish decorator fabric today for the body and saw some fuzzy felt for the tail and ears. I can’t wait to try this. I’ve always loved The Little Prince. (I’m 70 and have NO NEED for such a toy, but I want to make it. I might even make one for my newly collegiate granddaughter or my daughter…yeah, that’s it! EVERYONE needs a little fox. It must be in the rules somewhere.)
Any help is greatly appreciated.
LikeLike
lol Ah but even though we don’t need it, we do want it 🙂
I’ve redone the way the pattern is on the page. Each separate image is an A4 size for us that is 11,5” by 8” if printed as a full page each image should be the right size.
some pieces will seem big but that is the body pieces. I have marked where they need to be attached before cutting the fabric.
I wish I could be of more help but this was the easiest way I could think of to share the pattern.
Have a fantastic day, and good luck!
LikeLike
One more question, if that’s OK? When I print the Fox Body at 100%, the left side of the body piece measures 5 and 7/8 inches on the page.What should it be? I figure if I get that right with the correct percentage, the rest of the pieces should also be correct. (Maybe add a 1″ square to the first pattern page? Then if someone can get THAT to print proper size, they’ll be set.)
I have my rusty orange body fabric and a star stamp. Today I’ll get the furry white and brown/black bits after quilt club. Some of the other members are interested in your fox, too, so I’m not the only one needs a fox, apparently! :))
LikeLike
Hello please could you email me the pattern im having trouble downloading it in a workable size.
Love your version i made one from pinterest but prefer the head of yours. thank you
LikeLike